Menu
Menu
Website by ThierryD
rienquepourlesyeux@free.fr
Copyright 2010-2015
All rights reserved
Reproduction prohibited
Last update : 2021/03/11
The Saberstrip are light diffusers for flash. These diffusers are
relatively recent (2010) and are currently marketed as only on USA.
They sold about 130 Dollards but we can make for about 30 Dollards.
The saberstrip or striplights are classified in the same family as the softbox and
umbrellas diffusers.
Their goal is to diffuse the light.
The Saberstrip have several advantages over umbrellas diffusers:
- Outside, they are much less sensitive to wind.
- The light is diffused more directed than umbrellas, and that give
different effects quite similar to a softbox.
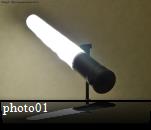
Photo01 watch to understand how the light of a flash is disseminated
through a saberstrip. The light is uniform throughout the length of the tube.
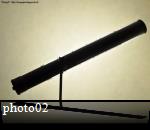
On Photo02, one realizes that the light is directed as with a softbox.
The photo02, also shows us a way to fix the saberstrip on one umbrella hot shoe.
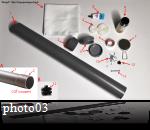
On Photo03, these are all materials used to manufacture the saberstrip.
all materials are available in DIY stores, except tissue (tissue store)
and the mirror (in the supermarket, in bathroom).
To make my saberstrip I used:
- A tube of PVC waste water 10 cm in diameter and 1 meter minimum (1).
- If you want to make two saberstrip, you will need a PVC tube of 2 meters
and you cut and keep one end of the tube 6 cm to follow suit
caps (2) (as shown in Figure A) .
- 2 screw caps (or manhole) diameter of 10 cm (3).
- A piece of tissue is the lining in clothing found in stores
tissue and sales per meter at a price of 3 Dollards, choose 1 meter (4).
This tissue is the same as umbrellas diffusers.
- From Velcro to secure the tissue on the saberstrip but also to be able to remove for
wash, for example. Use three meters by saberstrip (5)
- Aluminum tape, you can use aluminum for cooking, but it is less easy to install (6)
- A mirror of travel of 10 cm found in the bathroom department of supermarkets (7)
- A tube of neoprene glue to be used to glue the caps and Velcro (8)
- A spray paint to look pretty. Also provide a hang spray paint (9)
- Few screws, preferably in silver to fix the Velcro (10)
- A long srew of diameter 8 mm to secure the saberstrip on a hot shoe umbrella for example (11)
- A screw Kodak 1 / 4 ". You can buy it on Ebay. Figure B shows the screw 1 / 4"
chosen, it is quite long with 2 nuts (12)
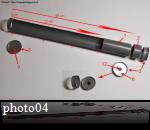
To begin, we must cut the PVC tube.
On Photo04 there all dimensions in cm and the shape of the cutout.
NB: If you use PVC pipe which (as the photo03 figure A) the wide side, you
not need the piece of tube noted (2). If you decide to make 2 saberstrip, the second
saberstrip will need that piece of PVC pipe to recess the screw cap (3).
Paste the mirror (7) in the screw cap lid with neopren glue.
Glue aluminum tape (6) in the other screw cap (3), then drill a hole
the center of the cover to insert the screw Kodak pitch 1 / 4 "(12)
The small red arrows indicate the different holes for the screws that secure the velcro.
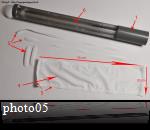
Now that the PVC pipe is cut (1), glue strips of aluminum tape (photo05).
Cut a piece of tissue (4) with the dimensions specified on the Photo05 and sew strips
Velcro (5) on edges.
Stick the screw cap (3) in the PVC pipe (1). If this is your second saberstrip, paste also
the small piece of PVC (2) with neoprene glue.
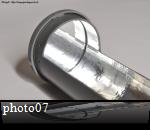
Paste the cover screw cap that contains the mirror at the end of the saberstrip as photo07,
with neoprene glue.
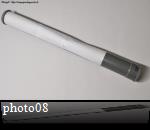
Now, we have to paint the saberstrip. Hide the opening with printer paper,
hold the paper with tape. The tape will also be used to hide small mounting holes
Velcro as the Photo08.
As you can see on photo08 at the foot of saberstrip, I made a small cut.
This cut will be used for my flash triggers that are Yongnuo RF-602. These triggers flash
are relatively long and exceeds the saberstrip. So I made that little cut that you are
not have to do.
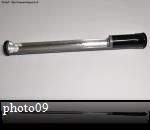
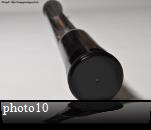
Photo09 and Photo10, the saberstrip is painted. It is almost finished, it remains to fix the Velcro
and positionning the tissue.
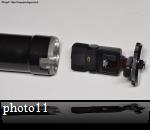
On Photo11, you can see the trigger Yongnuo and one of my flash ready to be screwed into the saberstrip.
We must now fix the Velcro on the saberstrip.
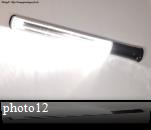
For proper fixation, put neoprene glue between the velcro and the saberstrip, and then screw the Velcro
as in Photo12.
On Photo12, we can see how the light is diffused in the saberstrip.
We see that it is a little brighter on the side or is the flash, but we also see that the mirror simulates a
second flash at the other end of saberstrip. With the tissue distribution will be uniform.
Take advantage, too, before positioning the tissue to find the balance point of the saberstrip and drill
a hole to screw the long screw that will secure the saberstrip on the umbrella hot shoe.
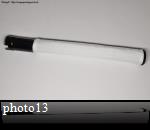
On Photo13, the saberstrip is ready, the tissue is positioned.
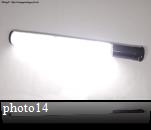
Photo14, we see that the light is diffused evenly over the entire length of the saberstrip.
It is a little brighter in the lower saberstrip.
That's great, it expands the coverage area on ??the entire length of saberstrip.
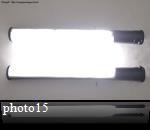
Photo15, my two saberstrip is face to face. The light is uniform.
The flashes are screwed into the saberstrip, they can be screwed and unscrewed at will.
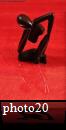
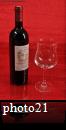
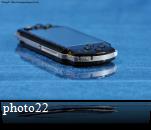
The Photo20 to Photo22, are examples of photos taken with two saberstrip.
A saberstrip vertically on the right, the other saberstrip horizontally and on height on the left.
For information, the pictures of the manufacturing process of saberstrip were made with my first
saberstrip. A single light source was used, which is why we see shadows under the materials.
The shadows are very soft.
For more examples of photos made with saberstrip, search on the Internet "photo saberstrip".
You will see that this kind of flash diffuser provides opportunities for beautiful light.
The fans of strobist style will love.
You can use other materials to make your saberstrip but there are three important points:
- Put aluminum, in the tube, to reflect light.
- The mirror at the end of saberstrip, otherwise you will not even light.
- The tissue for uniform and soften the light.
Good completion.
Copyright 2011 ThierryD - http://rienquepourlesyeux.free.fr
Last update 22/09/2011
Reproduction prohibited