Menu
Menu
Website by ThierryD
rienquepourlesyeux@free.fr
Copyright 2010-2015
All rights reserved
Reproduction prohibited
Last update : 2021/03/11
Here is a very interesting new body for amateur and professional photographers.
It is an all in one:
- Thermo colorimeter to measure the color temperature of the light and make the white balance.
- Metering to adjust the exposure of SLR camera (works with 1/3 EV, of 1.5 to 100,000 Lux)
- Flashmeter to measure and give the correct exposure, very useful with flash in manual mode.
- Sensor to make high speed photography (integrated mic, distance, light).
- Intervallometer for Time Lapse with the possibilities of controlling motors for movement.
- Depth of field calculator to be sure not to miss her picture.
- Calculator flash output in manual mode (coupled with flashmeter, can determine the NG flash).
- Bluetooth to interact and gather information to a tablet, a smartphone or a PC.
- WIFI transmission to remote control up to 6 modules in 350 uS and distances of 20-30 meters.
- 3.2-inch touchscreen for access to functions and settings and tweaks.
- Customizing the GUI easy without knowledge in computer programming.
- Case scalable, it is possible to add new functions.
- Control and set a DSLR camera without computer by WIFI (DSLR Remote Module).
The Photographer Tools, is a housing to make by yourself (DIY = Do It Yourself).
It does not require knowledge of electronics and computer science,
you just need to be
a handyman, and have a soldering iron
(with fine tip and 30 watts max: 6.40 Euros, seller: E44 http://www.E44.com),
a cutter and a few other small tools.
A short presentation of the finished box: Photo01, photo02, photo03 and photo04.
Photo 05 and Photo06, inside the box.
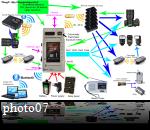
Photo07, a diagram of all the functions and possible connections of the project.
Detailed description of each function:
The colorimeter can therefore measure, and display color temperature to white manual balance.
The value is in degrees Kelvin, as the camera.
Many people shoot in RAW, and on treatment corrects the white balance.
So we let the camera handle the white balance.
It is very interesting to know the color
temperature of the light when shooting,
even if you shoot in RAW.
This allows to accurately reproduce the lighting in post processing.
If you work in JPG, it is even more important, because the correction of the white balance
in post-processing is destructive.
Our SLR camera handles quite well the white balance,
but in some cases it is mistaken.
I calibrated the colorimeter on the true color temperature
(what our eyes see).
It is possible to re-calibrate the colorimeter for yourself
(I provided a program for Windows PCs or in the configuration menu).
This possibility of
recalibration is interesting, if you would like to add a broadcaster Lumisphere
or or
Lumidisc Sekonic (15 Euros minimum).
I made the choice to not put a diffuser because it allows me to make very precise measurements.
But also because it would be necessary to define the exact diffuser model,
because each diffuser may have
different colors (blue, yellow, ...) and thus change the calibration
of the colorimeter.
It is possible to recover the value of color temperature on a tablet,
a Smartphone
or PC via Bluetooth (I provided a PDF file listing all the possible commands
to interact with the Photographer Tools).
The colorimeter operates with incident light,
the Photographer Tools is pointed towards the light source.
The display of the color temperature is in the same window as the exposure meter, Photo08 (3).
The Photographer Tools has the ability to manage up to 8 color profiles.
This allows more accurate profiles for different light sources,
but also
profiles for a true white or profiles respecting the lighting (human vision).
For more information, look in the menu of this website in "Programs for Photographer Tools".
The exposure meter give the correct exposure values??. I did the calibration with a
gray card.
It is possible to re-calibrate the exposure meter if you use a diffuser
(With the same program as the colorimeter or directly in the configuration/setup menu).
With the exposure meter, you can know the luminance expressed in LUX (this is a Luxmeter)
and the value of EV.
Aperture values ??are between F1 and F90.
The speed values ??are between 10 minutes and 1/8000s.
ISO values ??are between 25 and 102400.
The photography exposure is managed by three parameters: ISO, aperture and shutter speed.
With the exposure meter, two parameters are fixed and the third is calculated automatically.
The photo08 (3), shows to you the exposure meter window. The "Hold Value" button can
memorise the exposure,
when you using the exposure meter facing the sun, for example.
Your SLR camera uses reflected light: we point the lens toward the subject to be photographed.
Your SLR camera measures the light reflected on the subject that you want to photograph.
The exposure meter works by incident light, it must be put in place of the subject and
directed towards the light source.
This allows to measure each light source (if there are several)
independently.
The measuring of the incident light also has the advantage to take precise measuring
exposure at different locations, while our SLR camera
will make an overall measure of the scene
(measurement mode the full image).
In spot metering mode, there are likely to have errors
depending on the area chosen for the measurement.
The exposure given by the exposure meter is
correct for shooting with dark and light areas
corresponding to a gray level of 18%.
If the photo is composed mainly of very bright areas, you will
reduce exposures between 1 or 2 EV
(2 EV if the subject is white).
Conversely, it will increase the exposures between 1 or 2 EV,
if the picture is composed of dark or very dark.
The flash meter runs with incident light. It is placed before in the subject and the
"Photographer tools" is directed to the flash
for performing the measurement.
The flash meter is
very useful when working with one or more flashes in manual mode, for example with cactus
triggers,
YongNuo triggers.
To make the measurement with the flash meter, you must:
- Either connect the OUT1 of the box with a cable to sync connected to the flash, to measure.
- Either connect the OUT1 of the box on a cactus trigger, or another trigger, to control the flash.
- Use one "remote module" and connect the flash on the output of "remote module"
(I give more details on the "remote modules" when I speak of the detection for high-speed photography).
Photo08 (4), the window of the flash meter. To trigger flash and measure, you must press the "Start" button.
The flash meter calibration was done with a gray card, but it is possible to change the calibration
directly
in the interface "Configuration": Photo08 (8).
For the calculation of the exposure with the flash meter, you must select a value for ISO or aperture.
The speed is fixed because it is the flash sync speed.
The flash sync speed is between 1/160s and
1/250s, following the cameras and the flash triggers you used.
So I set the speed to 1/200s.
The flash duration of a flash is between 1/1000s and 1/30000s.
So with 1/200s,
the flash is properly measured by the flash meter (measuring during 5ms).
The detector can control 4 outputs (OUT1, OUT2, OUT3 and OUT4) but also WIFI "remote modules": Photo08 (5).
The "Remote module" works like a triggers (Cactus trigger, Youngnuo ...), they can be used as output
to trigger flashes, or as input for connecting remote sensors.
The range is 20 to 30 meters,
and you can used at the same time, 6 "Remote Module".
It is possible to connect a cactus trigger
(or other brand) on the "Remote module", and increase the scope
of all.
The "Remote module" can transmit and receive information in 356uS (about 2.5ms for cactus triggers).
We can (if you have the hardware) connect a cactus trigger transmitter on each "Remote module",
and used 4 cactus
triggers slaves on every cactus trigger master.
In theory, using the "Remote modules"
and OUT1, OUT2, OUT3 and OUT4,
it is possible to control 40 flashes with the "Photographer Tools" !
4 triggers by "remote module" (ie 4 x 6) + 4 triggers by OUT (4 x 4), it has been 40 flashes !
All outputs (OUT1, OUT2, OUT3, OUT4, and WIFI "remote modules") are independent.
You can choose the type of detection, tripping time, repeat for each output.
Using a large number of flashes, it is possible to create sequences or groups of flashes.
For each output you can define several parameters: Photo08 (6).
* The type of sensor:
- Microphone for shooting a bursting balloon or any sound.
- Light for a barrier laser or infrared (photography of water drops).
- Intervalometer for time lapse or motion decomposition.
- Line IN to connect an audio source, or a AM radio for lightning detection,
or a FM radio for the detection of Shooting stars.
- "Distance" and use the internal sensor distance (1 cm to 5 meters).
- "BT/USB" to trigger on an event provides by a tablet, a Smartphone
(shooting the photo from your smartphone),
a computer (for use my program of visual detection by a webcam).
- AUX1 and AUX2 to connect any external sensors (PIR = motion detector, external microphone,
external laser barrier, ...).
* The type of detection:
- DIGITAL, to trigger on a logic change (for a laser barrier: laser beam,
no laser beam present).
- ANALOG for detecting from a specific value.
- FILTER, very useful to the LINE IN input or microphone, it serves as a filter noise, and make detection.
Iif the threshold of the filter is exceeded.
* If you detect when the signal is above or below (ON UPPER / ON LOWER)
* The value of detection modes and ANALOG FILTER.
For each output, you can set all times values, independently of all other outputs: Photo08 (7).
* The DELAY for delaying, between the detection and the time you wish to trigger a flash, the DSLR ...
* DURATION to keeps tripping, for example if the DSLR camera is in auto mode, it is often neccessary to keep 500 ms
or
1 second, so that the development is done. If this time is not long enough, the SLR camera does not trigger the photo.
* SLEEP can pause, before a new detection, it is used with the REPEAT parameter to generate
pulses.
* REPEAT: This parameter is related to DURATION + SLEEP. Useful, for example, for a collision of water drops.
One can, for example, Interval Timer, leave a DELAY of 5000ms, a DURATION of 12ms and a
SLEEP of 10ms, and REPEAT to 1.
This will trigger two drops with a solenoid valve to 10ms interval
every 5 seconds.
To drive a solenoid (or motor), see the "Adapter for Photographer
Tools "in the left menu of the website.
An example for use Time lapse: The DSLR is connected to OUT1 (one picture every 1/5 seconds).
A DC motor
is connected (by a power adapter) on OUT2 for controlling movement on the X axis
On another motor is connected
on OUT3 to control movement on the Y axis. To control the speed of movement of each
motor, you can use DURATION,
SLEEP and REPEAT parameter, for generate pulses (PWM principle).
Photo09, the diagram to configure the outputs.
Each output is independent, so you can configure and save different settings detection.
The depth of field calculator, allows to know before the shooting, the value of depth of field (the
sharpness on a photo),
or it begins, and how far it ends. Simply indicate the aperture,
the type of sensor (24x36, APS-C, ...),
the focal length (35mm, 50mm, 200mm, ...) and finally the distance between the DSLR camera
and subject.
On the GUI. There is a checkbox "Auto", next to the distance who enables
the ultrasonic distance sensor,
and to automatically measure the distance to the nearest centimeter (5m range max).
Photo08 (1), the window of the depth of field calculator.
The power flash calculator, for flash in manual mode , permit to adjusts flash power very quickly.
Simply indicate the aperture, choose the ISO value, the NG (Flash Guide Number) and distance.
On the GUI,
a checkbox "Auto" next to the distance enables the Ultrasonic distance sensor,
and make the automatic measurement of the distance to the nearest centimeter (5m range max).
Usefull if you do not know your NG flash or if you want to know the new NG your flash with a softbox.
For example, it is possible by using the flash meter to know the NG.
To know this NG,
plug the "Photographer Tools" in the flash meter mode, set the power of your flash (eg 1/8).
Set the ISO value (eg 200).
Check the checkbox "Auto" for the field aperture.
Place the "Photographer Tools", for example, exactly at 2 meters of the flash.
Trigger the flash meter.
Now go to the menu "Manual flash power", see the aperture provided by flash meter mode,
enter the
distance (ie 2 meters). It remains to modify the value of the guide number (GN),
for that the value of
"Power Flash" is the same as the power setting on the flash (in this case 1/8), and know the NG.
Photo08 (2), the window of the manual flash power calculator
To enable Bluetooth and USB mode, go in the "Configuration" menu, the Bluetooth passcode is "1234".
I provided in the ZIP file of the project (in the "Download" section, in the menu on the left of this website),
the list of all
commands for interact and gather information from the "Tools Photographer" to a tablet,
a Smartphone or
a computer (USB or Bluetooth). By using the Bluetooth or the USB, it is possible to control
completely
the "Photographer Tools", but also to retrieve the values of exposure, color temperature,
trigger the outputs, ...
Photo08 (8), the "configuration" window.
In the "Configuration" menu, you can:
- Change the brightness of the touch screen
- Use a standby mode for the touch screen to conserve battery power or external batteries.
- Quickly change the settings of the exposure meter, flash meter and the colorimeter.
- Choose a customizable GUI. By default, I provided two "SKINS".
A first to work
in dark environments (MOON theme), and another in light environments (sunset theme).
You can create your own "SKINS" very easily. In the ZIP file of the project (in the "Download" section,
in the left menu of the website), I provided a PDF file explaining how to create your "skin" to customize the GUI.
You can choose the images, where you want to place the fields and touch areas.
The "Photographer Tools" works with an SD card, which allows you to save and restore the configuration to the ignition.
SD card store all the "SKINS".
The Photographer Tools is an evolving project: there is enough space to change the code,
add new features.
Lot of Inputs/outputs are available and ready for new extensions.
WIFI and Bluetooth communications,
offers some new opportunities and possibilities.
I have started thinking about this project in early 2012 (possibilities, mathematical formulas, design),
but
I really started this project in September 2012.
We are now in early 2013 and after 6 months of work,
I suggest to you to make it by yourself.
I provide maximum details and pictures to realize easily,
but if you have any questions,
problems in its implementation, you can ask your questions
in the forum (in the section Questions / Answers).
If you think I have not given enough explanations on the functioning,
the possibilities, you can
also ask questions in the forum.
The heart of the "Photographer Tools" is an Arduino DUE (a bit expensive but effective).
The Arduino DUE at a speed of 84 MHz, which can calculate quickly, but also to manage
BMP format images on the touch screen
(decoding and loading a BMP image of 320 * 200 pixels
in less than one second).
The Arduino DUE also has many inputs and outputs to manage all devices.
The DUE arduino has 512 KB of space for the program (I'm currently used a little less than half)
and also 96 KB of memory for variables. So I made the choice of who DUE arduino
costs 50 euros compared to an Arduino Mega
which costs 17 Euros on Ebay (Arduino Mega: 256 KB program
8 KB of memory, speed of 16 MHz).
To make this project, it is mandatory to solder electronic components on a printed circuit board (PCB).
This project is aimed at people with no knowledge of electronics, and do not have the equipment
to make a printed circuit board.
I suggest to you: I pass an order make printed circuit at cost price
and ship them to you by postal.
FYI: a single printed circuit board manufactured by a specializes company, costs 80 Euros.
If I order by 5, I can get it to 29,XX Euros with shipping.
Which is expensive, that is the first of a series,
because there are masks to make.
I therefore propose to provide to you this PCB for 30 Euros + 3.75 Euros for shipping
with a tracking number for France + 1.47 Euros for Paypal commission (I have rounded it to 36 Euros for France).
The shipping costs are 5.90 Euros for Europe(Paypal commission = 2,03), so I have rounded it up to 38 Euros.
The shipping costs for the rest of the world are 6.60 Euros (Paypal commission = 2,28), so I have rounded it up to 39 Euros.
I do not make money (this is not the goal), I do this service, just for that this project can be alive.
If you are interested, contact me by email (mail address at the bottom of the left menu of this site).
If I pass an order to make 100 printed circuit board, I could have prices in the range of
10 Euros or less.
But for this I should invest a lot of money, and I do not know in advance, the
number of people who are interested by this project.
That is why the price of a printed circuit board is 30 Euros.
Photo11, the model of design of the project on which I worked for a few months (a lot of wires !).
Photo12 a test og the Photographer Tools to create collision of water drops.
Photo13, a test of the colorimeter.
Photo10, the operating principle of the new module: DSLR Remote Module.
This module allows you to control and configure a DSLR camera since the Photographer Tools by WIFI,
and from a smartphone or tablet touch by Bluetooth.
The advantage of this module is the ability to directly edit the DSLR according to the measurements
of the Photographer Tools in exposure meter mode, or colorimeter or flash meter, and shoot a picture.
It is also possible to manually change the settings of digital cameras by going to the menu
"Configuration" on the Photographer Tools, and then clicking the "DSLR" button.
A new window appears, you can set the aperture, shutter speed, ISO, white balance and shoot a picture.
The picture is stored on the SD card DSLR. It is not possible to do video mode, only photo mode.
Now you can go to the section "Build the Photographer Tools" in the menu on the left of this
website
to know all the details of its manufacture.
Two new skins were added in the Tools Photographer ZIP file (skin3 and skin4).
These two new skins have been created by Franck (Kriffran94 for users of the forum).
I thank him for his contribution to the project.
All photos and texts are subject to copyright and distribution rights.
Reproduction in whole or in part, photographs and texts, without permission, is strictly prohibited.
Any commercial use of this arrangement is subject to intellectual property rights.
So thank you not to reproduce or distribute internet images and texts of this DIY.
Implementation and use of this DIY is allowed in a personal or school environment.
Copyright 2013 ThierryD - http://rienquepourlesyeux.free.fr
First update 03/03/2013
Last update 29/04/2015
Reproduction prohibited